项目演示地址:https://hujiyi.github.io/acme-world-web/
账号模块的路由规划
在当前项目中, 账号模块实现三个部分的功能:用户登录、用户注册、通过邮箱找回密码, 这三个部分都放在 src/views/account/ 文件夹下。
创建文件夹和文件
在 src/views/account/ 下创建名为 pages 的文件夹,然后在该文件下添加三个 vue文件:Login.vue, PasswordReset.vue, SignUp.vue。
创建完成后的 views 文件夹下的项目结构如下图:
1
2
3
4
5
6
7
8
9
10
| |-- account
| |-- pages
| | |-- Login.vue
| | |-- PasswordReset.vue
| | `-- SignUp.vue
| `-- Index.vue
|-- dashboard
| `-- Index.vue
`-- home
`-- Index.vue
|
编辑src/views/account/pages/Login.vue, 内容如以下代码:
1
2
3
4
5
6
7
8
9
10
11
12
| <template>
<div>用户登录</div>
</template>
<script>
export default {
name: 'Login',
}
</script>
<style>
</style>
|
编辑src/views/account/pages/PasswordReset.vue, 内容如以下代码:
1
2
3
4
5
6
7
8
9
10
11
12
| <template>
<div>通过邮箱找回密码</div>
</template>
<script>
export default {
name: 'PaswordReset',
}
</script>
<style>
</style>
|
编辑src/views/account/pages/SignUp.vue, 内容如以下代码:
1
2
3
4
5
6
7
8
9
10
11
12
| <template>
<div>注册新用户</div>
</template>
<script>
export default {
name: 'SignUp',
}
</script>
<style>
</style>
|
路由设计
打开 src/router/index.js, 给 name: 'Account' 的路由项添加子路由,编辑后的代码如下:
1
2
3
4
5
6
7
8
9
10
11
12
13
14
15
16
17
18
19
20
21
22
23
24
25
26
27
28
29
30
31
32
33
34
35
36
37
38
39
40
41
42
43
44
45
46
47
48
49
| import Vue from 'vue';
import VueRouter from 'vue-router';
Vue.use(VueRouter);
const routes = [
{
path: '/',
name: 'Home',
component: () => import('../views/home/Index.vue'),
},
{
path: '/account',
redirect: '/login',
component: () => import('../views/account/Index.vue'),
children: [
{
path: '/login',
name: 'Login',
component: () => import('../views/account/pages/Login.vue'),
},
{
path: '/signup',
name: 'SignUp',
component: () => import('../views/account/pages/SignUp.vue'),
},
{
path: '/password_reset',
name: 'PasswordReset',
component: () => import('../views/account/pages/PasswordReset.vue'),
},
]
},
{
path: '/dashboard',
name: 'Dashboard',
component: () => import('../views/dashboard/Index.vue'),
}
];
const router = new VueRouter({
routes
});
export default router;
|
整体布局
打开 src/views/account/Index.vue, 编辑其内容如以下代码:
1
2
3
4
5
6
7
8
9
10
11
12
13
14
15
16
17
18
19
20
21
22
23
24
25
26
27
28
29
30
31
32
33
34
35
36
37
38
39
40
41
42
43
44
45
46
47
48
49
50
51
| <template>
<el-row>
<el-col :md="12" class="hidden-sm-and-down">
<div class="grid-content bg-dark">
<span class="login-title">Element Forum Admin</span>
</div>
</el-col>
<el-col :md="12" :sm="24">
<div class="grid-content bg-light">
<router-view />
</div>
</el-col>
</el-row>
</template>
<script>
export default {
name: "Account",
};
</script>
<style>
.grid-content {
height: 100vh;
display: flex;
justify-content: center;
align-items: center;
}
.bg-dark {
background: #091d3b;
background-image: url("../../assets/login-pattern-left.png");
background-repeat: no-repeat;
background-position: -30% 60%;
}
.bg-light {
background: #e5e9f2;
}
.login-title {
color: white;
font-size: 36px;
font-weight: 600;
}
</style>
|
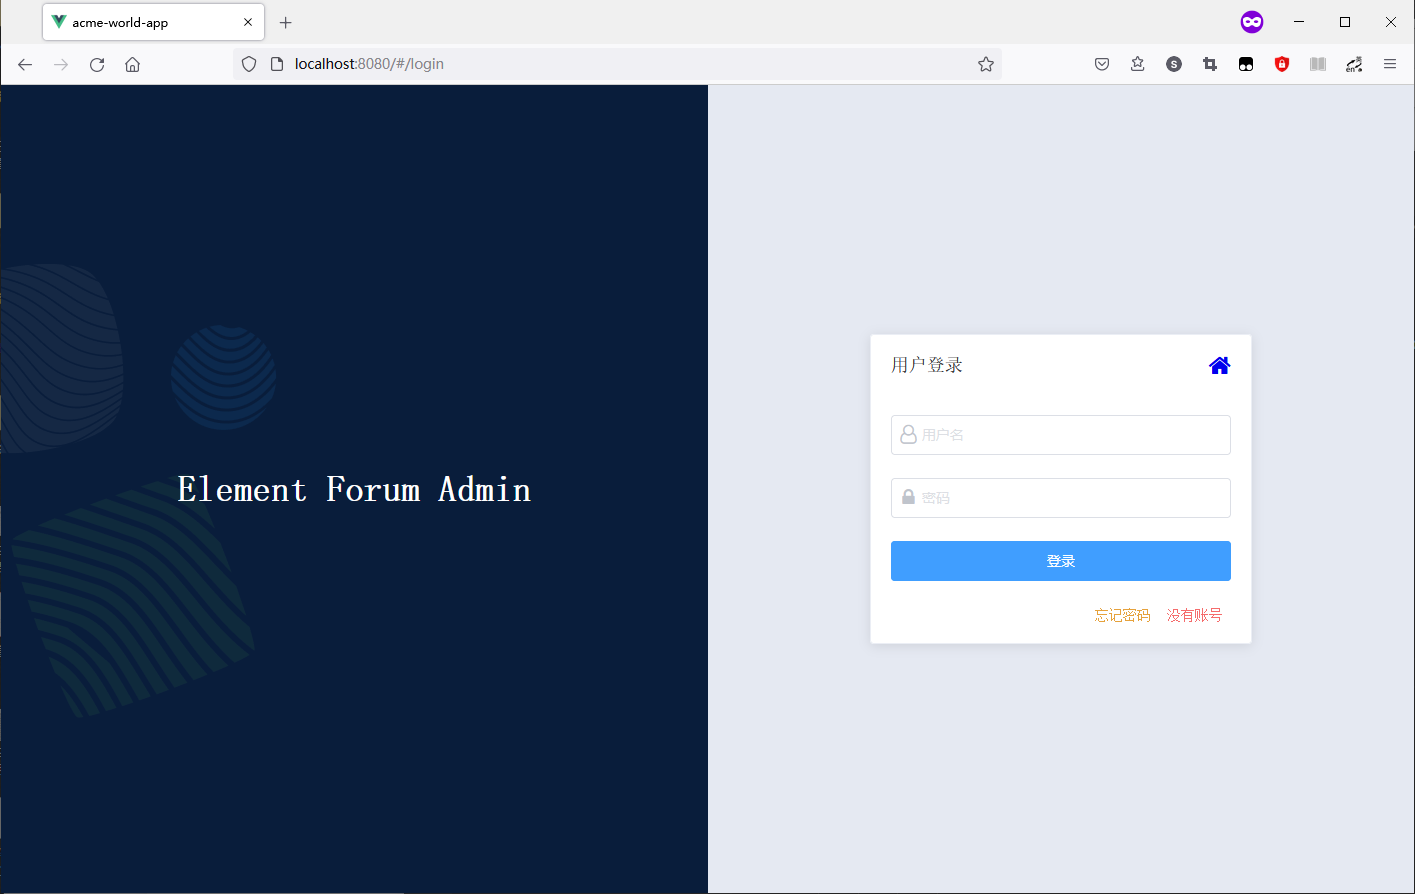
项目运行,进入登录页后的效果如下图:

说明: 这里使用了响应式设计,当窗口比较大时,可以看到页面分别 左右两个部分; 当把页面的宽度缩小,或是用手机等小尺寸设备打开网页时,左半部分将会被隐藏,效果如下图:

登录页的设计
打开 src/views/account/pages/Login.vue, 编辑其如以下代码:
1
2
3
4
5
6
7
8
9
10
11
12
13
14
15
16
17
18
19
20
21
22
23
24
25
26
27
28
29
30
31
32
33
34
35
36
37
38
39
40
41
42
43
44
45
46
47
48
49
50
51
52
53
54
55
56
57
58
59
60
61
| <template>
<el-card shadow="always" class="login-module">
<el-form>
<div class="horiz-container form-title">
<span>用户登录</span>
<div class="spacer"></div>
<span>
<router-link to="/">
<i class="fa fa-home fa-lg" aria-hidden="true"></i>
</router-link>
</span>
</div>
<el-form-item>
<el-input
type="text"
prefix-icon="fa fa-user-o fa-lg"
v-model="username"
placeholder="用户名"
></el-input>
</el-form-item>
<el-form-item>
<el-input
type="password"
prefix-icon="fa fa-lock fa-lg"
v-model="password"
placeholder="密码"
></el-input>
</el-form-item>
<el-form-item>
<el-button class="full-width" type="primary">登录</el-button>
</el-form-item>
<div class="horiz-container">
<div class="spacer"></div>
<router-link to="/password_reset" class="mx-2">
<el-link :underline="false" type="warning">忘记密码</el-link>
</router-link>
<router-link to="/signup" class="mx-2">
<el-link :underline="false" type="danger">没有账号</el-link>
</router-link>
</div>
</el-form>
</el-card>
</template>
<script>
export default {
name: "Login",
data: () => ({
username: "",
password: "",
}),
};
</script>
<style>
.login-module {
width: 380px;
}
</style>
|
以上代码中, 有两个样式:form-title 与 full-width 在 注册新用户 和 通过邮箱找回密码 界面中也要使用,为了减少重复代码,改为在父组件 src/views/account/Index.vue 中进行定义,这样就可以实现三个界面使用相同的样式了。
在父组件中添加各个子组件共用的样式
编辑 src/views/account/Index.vue, 在其 <style></style> 小节中添加 样式form-title 与 full-width 的定义,代码如下:
1
2
3
4
5
6
7
8
9
10
11
12
13
14
15
16
17
18
19
20
21
22
23
24
25
26
27
28
29
30
31
32
33
34
35
36
37
38
39
40
41
42
43
44
45
46
47
48
49
50
51
52
53
54
55
56
57
58
59
60
61
62
| <template>
<el-row>
<el-col :md="12" class="hidden-sm-and-down">
<div class="grid-content bg-dark">
<span class="login-title">Element Forum Admin</span>
</div>
</el-col>
<el-col :md="12" :sm="24">
<div class="grid-content bg-light">
<router-view />
</div>
</el-col>
</el-row>
</template>
<script>
export default {
name: "Account",
};
</script>
<style>
.grid-content {
height: 100vh;
display: flex;
justify-content: center;
align-items: center;
}
.bg-dark {
background: #091d3b;
background-image: url("../../assets/login-pattern-left.png");
background-repeat: no-repeat;
background-position: -30% 60%;
}
.bg-light {
background: #e5e9f2;
}
.login-title {
color: white;
font-size: 36px;
font-weight: 600;
}
.form-title {
font-size: 18px;
font-weight: 400;
height: 60px;
}
.full-width {
width: 100%;
}
</style>
|
用户登录的界面效果如下图:

注册新用户
将 src/views/account/pages/Login.vue 的内容全部复制, 粘贴到 src/views/account/pages/SignUp.vue 中替换原来的内容, 然后做以下的修改:
1
2
3
4
5
6
7
8
9
10
11
12
13
14
15
16
17
18
19
20
21
22
23
24
25
26
27
28
29
30
31
32
33
34
35
36
37
38
39
40
41
42
43
44
45
46
47
48
49
50
51
52
53
54
55
56
57
58
59
60
61
62
63
64
65
66
67
68
69
70
71
| <template>
<el-card shadow="always" class="login-module">
<el-form>
<div class="horiz-container form-title">
<span>注册新用户</span>
<div class="spacer"></div>
<span>
<router-link to="/">
<i class="fa fa-home fa-lg" aria-hidden="true"></i>
</router-link>
</span>
</div>
<el-form-item>
<el-input
type="text"
prefix-icon="fa fa-envelope-o fa-lg"
v-model="email"
placeholder="电子邮箱"
></el-input>
</el-form-item>
<el-form-item>
<el-input
type="text"
prefix-icon="fa fa-user-o fa-lg"
v-model="username"
placeholder="用户名"
></el-input>
</el-form-item>
<el-form-item>
<el-input
type="password"
prefix-icon="fa fa-lock fa-lg"
v-model="password"
placeholder="密码"
></el-input>
</el-form-item>
<el-form-item>
<el-button class="full-width" type="primary">注册新用户</el-button>
</el-form-item>
<div class="horiz-container">
<div class="spacer"></div>
<router-link to="/login" class="link">
<el-link :underline="false" type="success">使用已有账号登录</el-link>
</router-link>
</div>
</el-form>
</el-card>
</template>
<script>
export default {
name: "SignUp",
data: () => ({
username: "",
password: "",
email: "",
}),
};
</script>
<style>
.login-module {
width: 380px;
}
</style>
|
注册新用户的界面效果如下图:

通过邮箱找回密码
将 src/views/account/pages/SignUp.vue 的内容全部复制, 粘贴到 src/views/account/pages/PaswordReset.vue 中替换原来的内容, 然后做以下的修改:
1
2
3
4
5
6
7
8
9
10
11
12
13
14
15
16
17
18
19
20
21
22
23
24
25
26
27
28
29
30
31
32
33
34
35
36
37
38
39
40
41
42
43
44
45
46
47
48
49
50
51
52
53
54
55
56
| <template>
<el-card shadow="always" class="login-module">
<el-form>
<div class="horiz-container form-title">
<span>通过邮箱找回密码</span>
<div class="spacer"></div>
<span>
<router-link to="/">
<i class="fa fa-home fa-lg" aria-hidden="true"></i>
</router-link>
</span>
</div>
<el-form-item>
<el-input
type="text"
prefix-icon="fa fa-envelope-o fa-lg"
v-model="email"
placeholder="电子邮箱"
></el-input>
</el-form-item>
<el-form-item>
<el-button class="full-width" type="primary">发送找回密码的邮件</el-button>
</el-form-item>
<div class="horiz-container">
<div class="spacer"></div>
<router-link to="/login" class="link">
<el-link :underline="false" type="success">使用已有账号登录</el-link>
</router-link>
<router-link to="/signup" class="mx-2">
<el-link :underline="false" type="danger">没有账号</el-link>
</router-link>
</div>
</el-form>
</el-card>
</template>
<script>
export default {
name: "PasswordReset",
data: () => ({
email: "",
}),
};
</script>
<style>
.login-module {
width: 380px;
}
</style>
|
通过邮箱找回密码的界面效果如下图:

后继内容:
使用 Element UI 和 Leancloud 的 Vue.js 项目开发 V
===END===


